Nothing announces the arrival of spring like butterflies in flight! The soft flutter of butterfly wings are enough to set any child in a mesmerized trance. Their color, grace, and beauty are all to be admired. This spring, prepare for the arrival of colorful butterflies by making your very own! These tissue paper butterflies are simple to make, require just a few items found around the home or your local dollar store, and make great Easter crafts for kids.
This activity not only yields colorful butterflies, but allows kids to practice fine motor skills and discuss all of the fun facts about butterflies! Included below is even a list of butterfly texts appropriate for kids, so you can enhance this learning experience! So take a peek and see how easy it is to whip up your own fancy tissue paper butterflies!
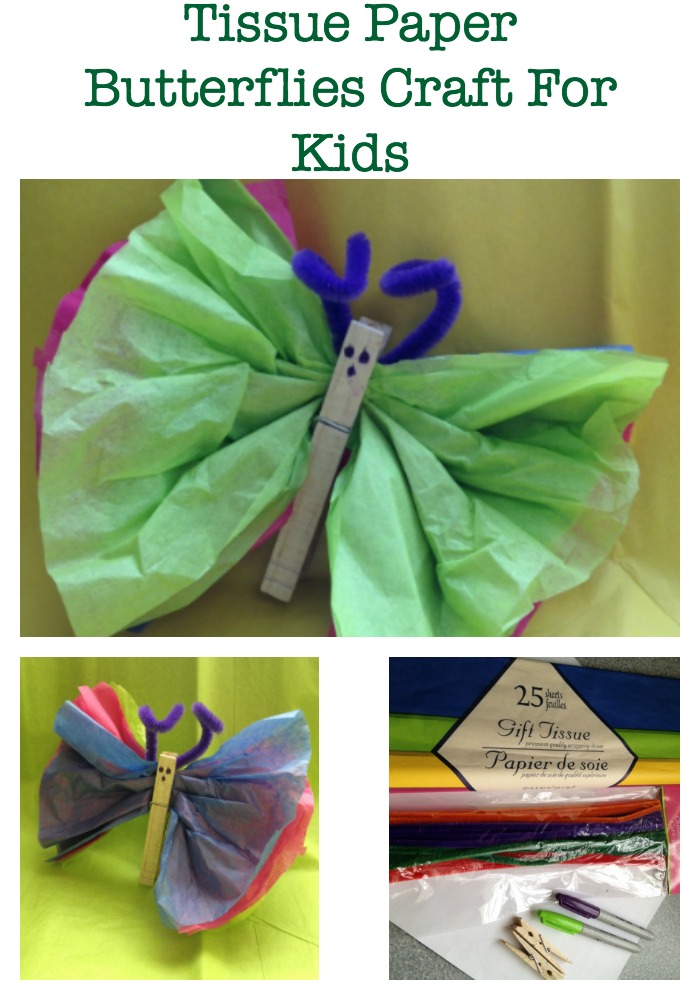
How to Make These Cute Easy Easter Crafts for Kids
Materials:

- Wooden clothespins (dollar stores sell packs of 24 for $1.00)
- Pipe cleaners (dollar stores sell packs of 24 for $1.00)
- Colorful tissue paper (found in the gift wrap section of dollar store)
- scissors
- markers
Directions for these fun Easter crafts for kids:
- Cut several 10-in. squares from the tissue paper.
- Gather the squares of tissue into a uniform pile. Fold the tissue paper, accordion style.
- Squeeze a clothespin open and clip it over the midpoint of the folded tissue. Open the wings out on either side.
- Bend the pipe cleaner to form a “V” shape for the antennas. Bend each end of the antennas into a little “O” shape or knot.
- Clip the “V” shape of the antennas into the clothespin, on top of the folded tissue.
- Use markers to draw the butterfly’s eyes just below the antennas.
That’s it! Display these lovely creatures in a sunny window, or give them as a gift to someone special! They are so cheery and colorful, and are sure to brighten up any room or day. You can also make several of these if you wish, attach fishing line or yarn, and hang from a ceiling for an instant spring look!

When finished, why not take the time to make a list of butterfly facts? You can make a list of the ones you know, and make a list of the questions you have. Explore one of the many texts available to help you learn more about butterflies and get an up close look at these amazing creatures!
Here are a few books to get you started!
Butterflies![]() , By Seymour Simon
, By Seymour Simon
My, Oh My–A Butterfly!: All About Butterflies (Cat in the Hat’s Learning Library)![]() , By Tish Rabe
, By Tish Rabe
National Geographic Readers: Great Migrations Butterflies![]() , By Nat Geo
, By Nat Geo
So what are you waiting for? Create your own colorful butterflies with your kiddos today, and start learning more about their fascinating life! You will be amazed at the facts you can learn, not to mention how sweet and colorful your home will look with these tissue paper butterflies flying all about!
For more Easter crafts for kids, check this Easter Egg Craft and this DIY cup flower Easter craft for kids
I did this with my kids then put a magnet strip on the back to hang on the fridge.
How cute, this would be an easy craft for kiddos for sure! Thanks for sharing!
I love this craft. My oldest kids did this for the first time in Sunday school years and years ago. I think it’s time to revisit it for the younger two now. 🙂 happy easter.
There would be all kinds of fun color combinations to make for the wings. Neat!
I love how some of the cutest craft ideas are also the easiest…this one looks like a winner!
I love it! I just pinned it to my Easter Pinterest Board.
Awww so cute – brings me back to my days teaching preschool and Kindergarten!
How adorable! What a great way to celebrate spring.
I remember doing this as a child. We recently made some coffee filter butterflies and strung them along a string. I would like to invite you to share your post with us on our linky, Share It Saturday. We have lots of creative bloggers linking up each week and you would fit right in! http://www.sugaraunts.com/2013/04/share-it-saturday-14-and-our-week-in.html I hope to see you there!
Colleen at http://www.sugaraunts.com
Such a cute and easy craft. I love it!
What a fun idea! I’ve pinned this to my Favorite Craft Board. I found you over at Table for Seven’s Link Party.
I’d love it if you’d consider sharing at Brag About It | Link Party at VMG206!
http://www.vmg206.com/2014/02/brag-about-it-link-party-no-43-vmg206.html
~ Megin of VMG206
So cute and easy! Added to my shared Pinterest parenting board. Will definitely be trying these with the twins.
Love this cute (and easy) idea! Thanks for sharing!
These are too cute!! pinned 🙂 Would love you to link up at our Snickerdoodle Sunday sometime!
Cute! I bet my son would love to do this!
Great idea. I’ve done this with my children in the past and it works great. It’s really simple and children of all ages can decorate it according to their age level.
What a fun kid craft!
These are cute, cute…my kids would love to make them!
Such a cute and fun project. My kids will love this. Thanks for linking up to BOTW party!!
What a cute idea! Checking it out from nifty thrify sunday! Cute, Cute idea! 🙂
Cathy
What a sweet craft idea, love how easy it is! Thanks for sharing on the weekend re-Treat link party. Hope you link up to the party again tomorrow!
Britni @ Play. Party. Pin.